

- How can I edit the metadata of my material?
- Which metadata is necessary?
- What must be considered when specifying a license?
- How do I give credit (authorship) for OER?
- What is a good title?
- What is the best way to set keywords?
- My (link) object only shows a generic icon in the preview. Can I display a thumbnail of the landing page?
- How do I select the entry in the metadata field "Origin"? Should I also set it for link objects?
- I have several quite similar OERs. Can I simplify the metadata entry?
- How can I add didactic metadata?
- How can I edit the metadata of my material?
- Which metadata is necessary?
- What must be considered when specifying a license?
- How do I give credit (authorship) for OER?
- What is a good title?
- Choose the title as precisely as possible and name the content as concisely as possible.
- Include technical terms in the title.
- If possible, avoid creative titles that do not specifically name the content. While they arouse interest, they may lure users down the wrong path.
- Avoid abstract terms such as Introduction, Lesson 1, Exercise Part 3.
- What is the best way to set keywords?
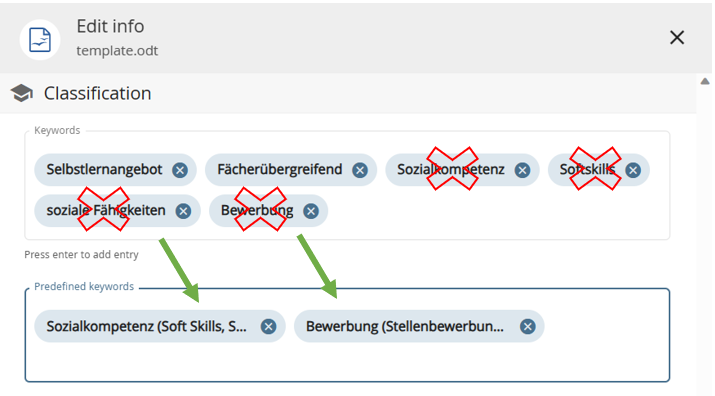
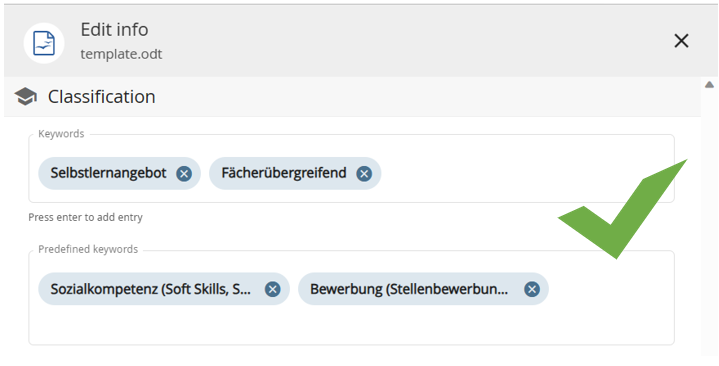
- Assign three to seven meaningful terms/keywords.
- Use the keywords in singular.
- Use verbs in indicative and with a capital letter.
- Don't use word groups and phrases.
- Maintained and regularly updated vocabulary
- Avoid spelling mistakes / different spellings
- Coverage of synonyms (in parantheses)
- The same is found with the same terms
- My (link) object only shows a generic icon in the preview. Can I display a thumbnail of the landing page?
- How do I select the entry in the metadata field "Origin"? Should I also set it for link objects?
- I have several quite similar OERs. Can I simplify the metadata entry?
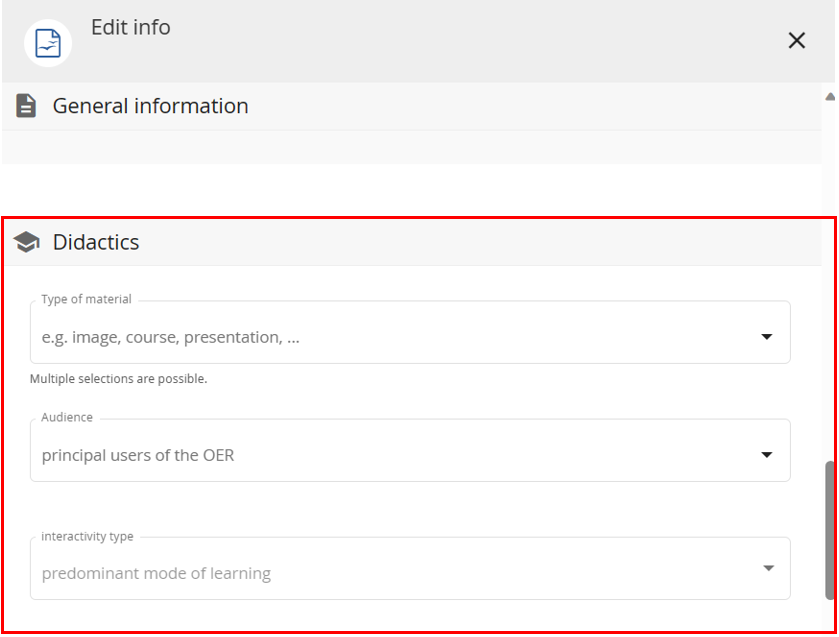
- How can I add didactic metadata?
- Type of Material: Here you can choose from a variety of material types that is suitable for your material, such as course, assessment, reference work, etc.
- Audience: Select here to whom the material is primarily directed to.
- Interactivity Type: In this case, you can choose from
three options. Please consider the following explanations and choose
the one, which is for your material most dominant.
- Active learning (e.g., learning by doing) is supported by content that directly induces productive action by the learner. An active learning object prompts the learner for semantically meaningful input or for some other kind of productive action or decision, not necessarily performed within the learning object's framework. Active documents include simulations, questionnaires, and exercises.
- Expositive learning (e.g., passive learning) occurs when the learner's job mainly consists of absorbing the content exposed to him (generally through text, images or sound). An expositive learning object displays information but does not prompt the learner for any semantically meaningful input. Expositive documents include essays, videoclips, all kinds of graphical material, and hypertext documents.
- Mixed learning blends the active and expositive interactivity type in the object.
To change your material's metadata, go to your workspace and open the menu options (⋮) of the material you would like to customize. Select "Edit info" here.
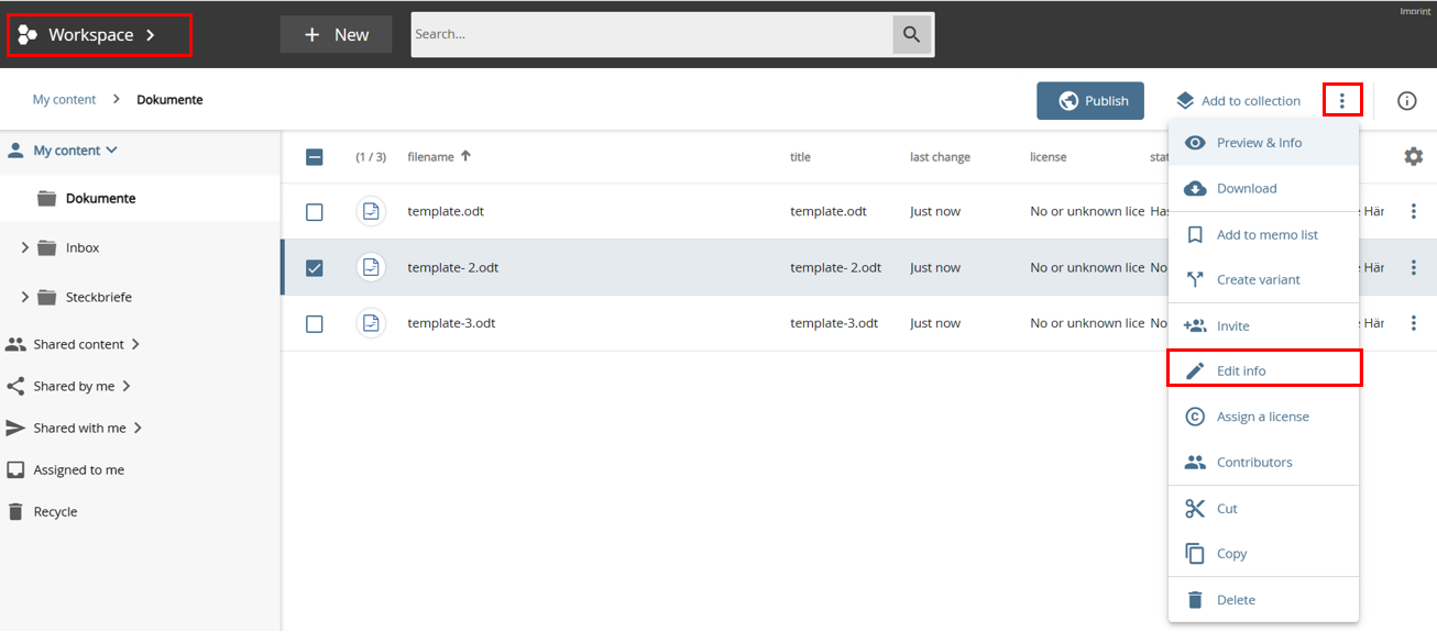
Alternatively, you can access the metadata dialog by opening your material and selecting the top right menu (⋮). In this menu, you also find the "Edit info" item, which takes you to the metadata dialog box.
In ZOERR, title, author/originator and license are mandatory data.
They must be provided in order to publish a material.
These indications are minimum information for the quality assurance of the materials
and ensure that the materials can be found.
In addition, it is advisable to write a brief description of the material,
supplementing its origin, type and language. For searching, it is
helpful if keywords and a preview image are assigned.
Optionally, you can add further contributers and technical information
for subsequent use to your educational material in ZOERR.
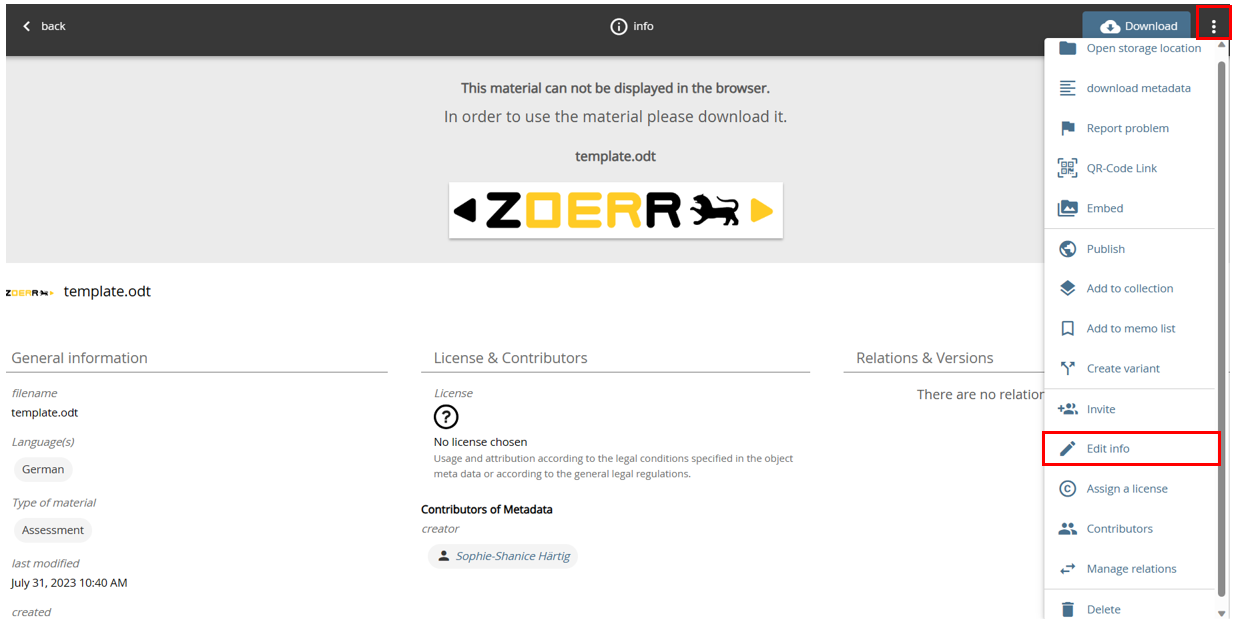
In the metadata dialog box (see question 1) you
have the option of granting a license for the material you have
provided. To do this, select "Manage License" in the License area. You
can also access the same license dialog via the menu (⋮) and
the "Assign a license" option.
In the following window you can choose between the
licenses CC 0/Public Domain, CC-BY and CC-BY-SA.
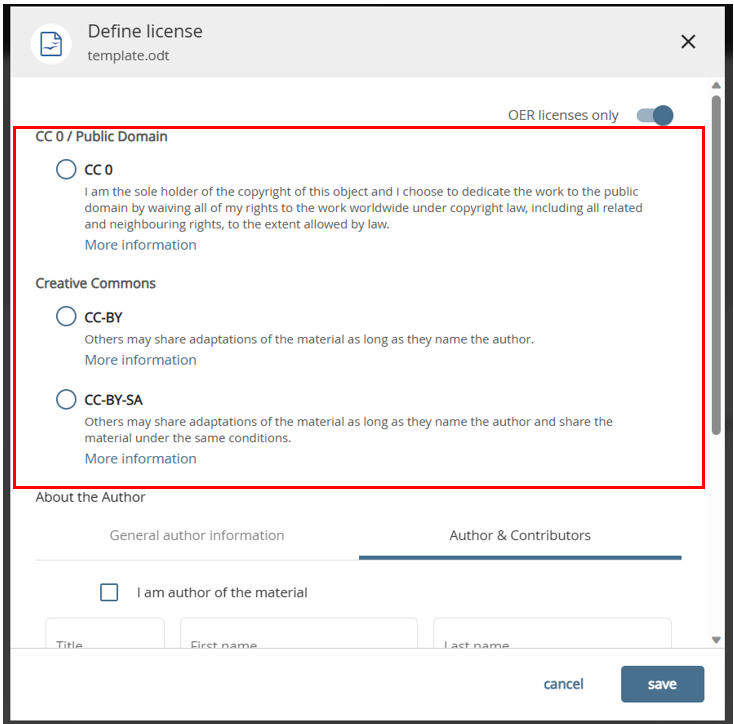
If the desired license is not included, you can deactivate the option "OER licenses only" using the switch at the top right. Please use the OER licenses preferably and only under special circumstances a different license.
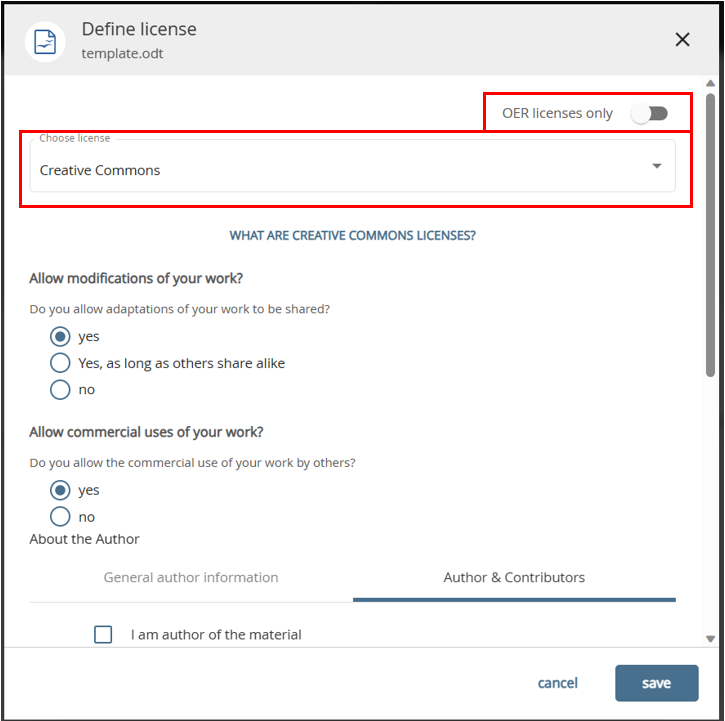
If you select "Creative Commons" from the drop-down menu in the following window, you will be guided through the further process of selecting a license with the help of two questions.
The current version of the Creative Commons license is automatically preset. If you want to change the license version, you can use the drop-down menu at the bottom of the window.
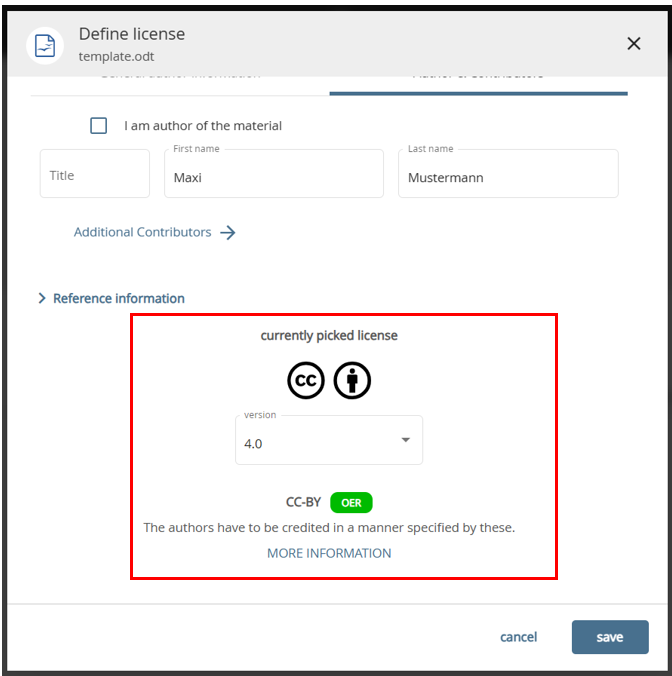
✎If you have decided on a license that contains the BY module, it is mandatory to state the author. CC licenses of Version 3.0 also require a title to be specified.
When your license information is saved, it will appear in the description of your materials. For more information on the Creative Commons licenses see the ZOERR License FAQ.
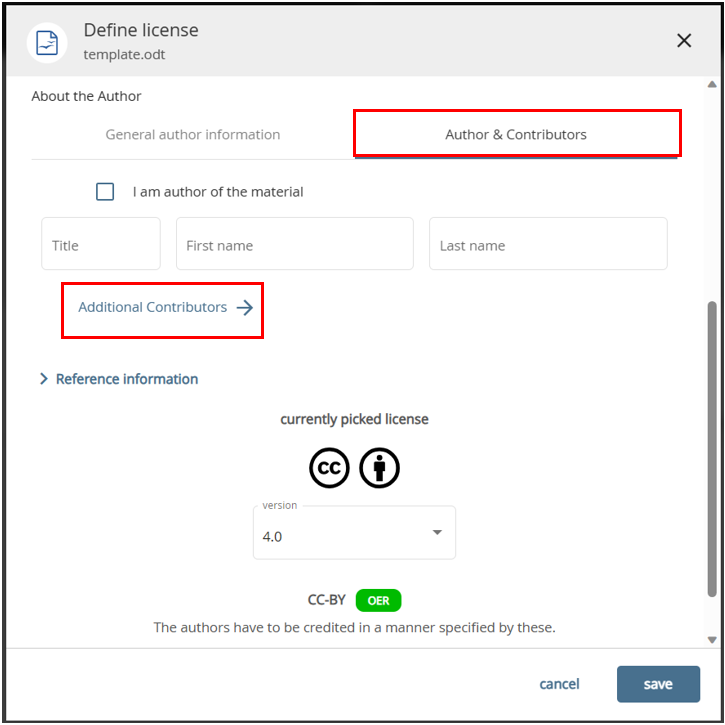
In the "About the author" section, you have two options for
specifying authors: Via the "General author information" or "Authors &
Contributors" buttons. If possible, please select the option "Authors &
Contributors" and name the specific person. If you are the author
yourself, you can select "I am author of the material".
Furthermore, you also have the option of adding several authors and
other people involved in the development of the material, e.g. editors,
graphic designers within the same dialog box. To do this, select
"Additional Contributers" below the input field.
Click on the "Add" input field under "Additional Contributers".
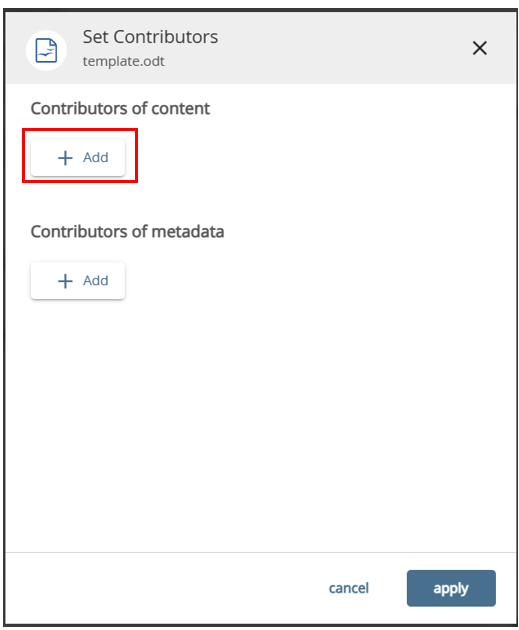
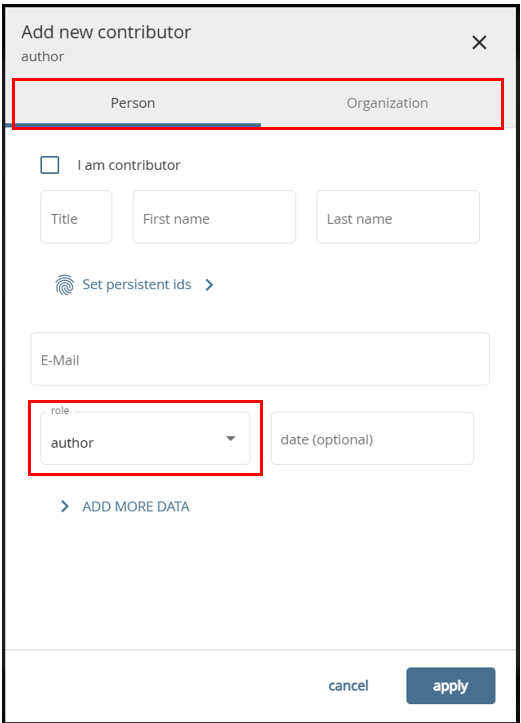
In the following window you have the option of naming all authors, people and/or organisations involved as well as their role. Enter a name in the input mask and then select the appropriate function, e.g. graphic designer, in the role field. You have the choice between 14 different roles. Save your entry with the "apply" button. To add more collaborators, repeat the previous steps.
Please only choose the "General author information" if no persons can be named as the author. Here you can, for example, name institutions or companies as authors. You can change the author information at any time: To do this, open the desired educational material in your authoring environment and select the "Contributors" option in the menu (⋮).
A meaningful title is an important descriptive category of educational material. It facilitates the technical discoverability of the material and assists users in their search.
Anything that cannot be included in the title can be used as a keyword. Because this can also increase the discoverability of the materials. Here are a few tips for assigning keywords:
If you cannot assign your material to a subject, it is possible to tag it so that it can be found as interdisciplinary material. To do this, enter a corresponding note in the input mask for the key words, e.g. Interdisciplinary, Core Competence, University Didactics or other suitable information. In taht case leave the metadata field "Subject" blank.
It may happen that you do not like the image generated by the system, or it could not generate one at all, such as with links. In these cases you can deposit a preview image. To do this, select the "edit info" menu option in the editing dialog box and click on the round button with the up arrow next to the image. Then you can select an image file that will be used as a preview image in the future.
For the "Origin" field, please always select the organisation to
which you belong or through which the material was posted. This allows
in the search environment, to view all materials posted by a university
at a glance. The portal view of the repository adapted to a university
also shows all materials originating from this university on the start
page.
However, in the case of link objects pointing to external sites, this
might not be appropriate.
Here it is important to consider if it is appropriate to omit the origin
in the metadata with the correct content or whether it is better to
specify the college that entered the link so that these link objects can
also be displayed in the hit list when searching for the college's
materials. We can't give a definitive guide on this, ultimately it is
the authors decision to make.
When right-clicking on a folder on the left in the workspace, you can select "Metadata Template" from the menu. In the following dialog box you can preset values for various metadata. In the case of materials that are newly imported into this folder, these values are already entered, changes are of course always possible. This functionality is intentionally not available for licenses and author names. Also note that the metadata template is not inherited by subfolders.
To add didactic metadata, open the metadata dialog "Edit info" first.
In this dialog, you now have the option to specify the following three didactic metadata in the "Didactics" section: